Free Patterns To Spruce Up Your Christmas Tree

Free Crochet Christmas Ornament Patterns

Christmas is only two weeks away!  If you are looking for some unique decorations to spruce up your Christmas tree, below are some wonderful free crochet ornament patterns.  These ornaments would also make wonderful stocking stuffers or gifts for family and friends.

1.  Snowman Ornament by Audra Brown.  The pattern for these adorable little snowmen is available as a free ravelry download.

2.  Teddy Ornaments from All About Ami Blog.  These cut little ornaments would look great on a child’s holiday tree.

3.  Little Christmas Socks by Le Monde De Sucrette.  I love these little stockings.  Would look great on a Christmas tree or at your Christmas table.  One year I used stockings similar to this as silverware holders at each place setting.

4.  Quick and Easy Christmas Ornament by Roswitha Mueller.  This angel pattern is available as a free ravelry download.

5.  Snowflake Ornament from Red Heart.  

6.  Christmas Wreath by Doni Speigle

New Holiday Pattern Release: Reindeer, Santa & Grinch Hat

New Holiday Pattern Release

Santa Claus, Reindeer and Little Grinch Hat

As promised, I have released my three latest patterns.  I received feedback from my wonderful testers and the patterns can now be found on both Ravelry and Craftsy!  Thank you again to everyone who volunteered to test these patterns.  
I have been working on these patterns for weeks and I am very happy with the finished product.  I think these will make great holiday hats.  The Santa Claus and Reindeer hats include all sizes and have separate instructions for a beanie hat and an earflap hat.  The little Grinch is a beanie and has instructions for sizes 0-3 months through 3 years.

For a limited time, I am offering all three patterns for $5.99.

Buy On Craftsy           Buy on Ravelry

You can also purchase the patterns individually on both sites.

Wool and the Gang: DIY Fashion and High Quality Wool Yarns

Wool and the Gang:  High Quality Peruvian Wool Yarns and Knitting Kits and Ready to Wear Items.

 I recently discovered an online retailer of high quality wool yarns, knitting kits and ready to wear items, Wool and the Gang.  Wool and the Gang was founded by DIY fashionistas, Lisa Sabrier and Carolyn Main in 2008.  They offer stunning ready to wear pieces that have been handmade in the mountainous regions of Peru using their lovely yarns.  

Not only are they an online retailer, they are also a community.  The company describes itself as, “Wool and the Gang is the first DIY fashion brand, it Is the story of a family, it’s a tradition passed from generation to generation, re-invented, self taught, a bond between gang members, a gang of knitters, guys and girls from 7 to 77 years old, all tied together by a piece of yarn…”.  On their website you can find many video tutorials for those who are still learning to knit.  You can also request a lesson if you do not see the video tutorial you need.

If you are familiar with knitting, Wool and the gang offers a variety of DIY knitting kits. Some of their project kits include hats, scarves, vests, sweaters and many more.  The kits come with everything you will need to make the project, even the needles!  The projects are all labeled as to their level of difficultly.   With the holidays right around the corner, these knitting kits would make the perfect gift for the knitter in your life or buy one for yourself and use it to make a homemade gift.  

If you are unfamiliar with knitting, their beautiful wool yarns would also work well in any crochet project. They come in a variety of vibrant colors.  They carry Peruvian wool, prima cotton and baby alpaca yarns.  

Click here to visit, Wool and the Gang


Tutorial: How To Make A Yarn Pom Pom

Tutorial:  How to Make a Yarn Pom Pom


Adding a yarn pom pom is a great way to add a little fun to just about any crochet project.  I especially love to add them to winter hats.  Yarn pom poms are quick and simple to make!

All you need is some yarn in your desired colors, your hand and a pair of scissors!

The pom pom I made in the example below only uses one color but you can make a multicolored pom pom by switching colors after every few wraps. 


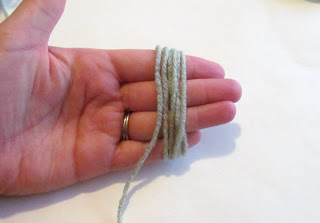
Step 1:  Start by taking your yarn and wrapping it around a hard surface.  You can use your hand, a small piece of cardboard or any other small surface. 


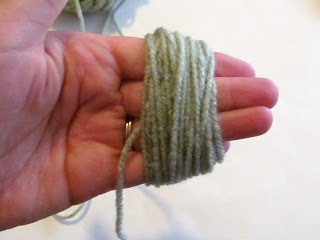
Step 2:  Continue wrapping the yarn.  The more times you wrap the yarn, the thicker your pom pom will be.  As a point of reference, I wrapped the yarn around my hand 30 times for this particular pom pom.

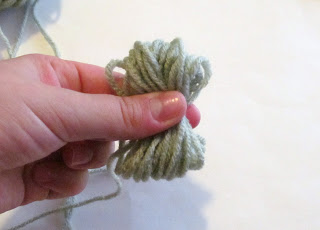
Step 3:  Slip the wrapped yarn off of your hand or surface and using a separate piece of yarn, tie a knot around the center. 


 Step 4:  Slip scissors through the loops on each end of the pom pom and cut across to create the fringe.

Step 5:  Fluff the yarn to form the pom pom.

Free Crochet Pattern: Ribbed Cuff Fingerless Gloves

Free Crochet Pattern Release:  Ribbed Cuff Fingerless Gloves


I created this pattern yesterday morning on a whim.  It’s a very basic pattern for fingerless gloves featuring a ribbed cuff.  Very quick to make, the gloves probably took me an hour total and that included the time it took me to write the pattern.  Enjoy!

Materials:

Size H crochet hook
Worsted weight yarn (I used Redheart Wth Love)
Needle


Gauge:
3 dc = 1”
2 rows of dc = 1”
 

Abbreviations:

ch = chain
sl st = slip stitch
sts = stitches
dc = double crochet
fpdc = front post double crochet
bpdc = back post double crochet

Pattern:

Round 1:  Ch 25, sl st to 1st chain to form a ring.  Be careful not to twist the chain.
Round 2:  Ch 3, dc in next stitch and in each stitch around.  Sl st in top of ch 3 to join round.
Round 3:  Ch 3, (fpdc in next st, bpdc in following stitch) repeat all the way around.  Sl st to top of ch 3 to join round.
Round 4:  Repeat round 3
Round 5:  Ch 3, dc in next st and in each st around. Sl st to top of ch 3 to join round.
Round 6-12:  Repeat round 5.
Round 13:  (This round creates the thumb opening) Ch 3, dc first 20 sts, ch 4, skip remaining stitches and sl st to top of ch 3 to join round.
Round 14:  Ch 3, dc in each stitch and chain around.  Sl st to top of ch 3 to join round.
Round 15:  Ch 3, (fpdc in next st, bpdc in following stitch) repeat all the way around.  Sl st to top of ch 3 to join round.
Round 16: Repeat round 15.

Tie off yarn.  Using the needle, weave in all loose ends.

Free Crochet Pattern: Two Tone Ballet Slippers


Two Tone Ballet Slippers


By
Tampa Bay Crochet
Please do not sell this pattern.  For more free patterns, visit http://tampabaycrochet.blogspot.com.

You may also download this pattern for free through Craftsy by clicking here.

Sizes (U.S. shoe size):
Small:  5-6
Medium:  7-8
Large:  9-10
x-large:  11-12
Materials:
Needle (for weaving in loose ends).
Size H crochet hook
Worsted weight yarn.  For this pattern, I used Redheart Super Saver.

Abbreviations:
Ssc:  Same stitch cluster
Tsc:  Two stitch cluster
Sc:  single crochet
Sl st:  slip stitch
St:  stitch
Special Stitches:
Same stitch cluster: Yarn over, insert hook in next stitch, yarn over pull up a loop, yarn over and pull through first two loops on hook, yarn over and insert hook in same stitch, yarn over and pull up a loop, yarn over and pull through first two loops on hook, yarn over and pull through all three loops on hook.
Two stitch cluster: Yarn over, insert hook in the same stitch as the last stitch made, yarn over and pull up a loop, yarn over and pull through first two stitches on hook, yarn over and insert hook into the next stitch, yarn over and pull up a loop, yarn over and draw through first two loops on hook, yarn over and pull through all three loops.
Slippers:
Row 1:  Ch 4, ssc 7 times in 4th ch from hook (7 stitches)
Row 2:  Ch 3, 2 ssc in each stitch around (14)
Row 3:  Ch 3, 1 ssc in each stitch around (14)
Row 4:  Ch 3, 2 ssc in next st, 1 ssc in next 3 st, repeat 2 more times, 2 ssc in next st, 1 ssc in next  st. Join with a sl st to top of ch 3 (18)
Row 5:  Ch 3, tsc in each st around (18)
Row 6:  Ch 3, tsc in each st around. (18)
If switching colors, tie off yarn and sl st with new color to join.
Row 7:  Ch 3, tsc in each st around (18)
Row 8:  Repeat row 7
Row 9:  Ch 3 turn, tsc in next 13 sts.
Row 10:  Ch 3 turn, tsc in next 13 sts,
Row 11:  Repeat row 10 until your slipper reaches your desired length.  Check the length of the slipper by folding it in half lengthwise.  Next, measure from the tip of the toe to your last completed row.  
 Here are the desired completed lengths for each size.
For size small:  the slipper should now be around 8”
For size medium:  the slipper should be around 8.75”
For size large:  the slipper should be around 9.25”
For size x-large:  the slipper should be around 9.75”
Last Row:  Ch 1, hdc in next 3 sts, hdc2tog 4 times, hdc in last 3 sts.  Tie off leaving a 12 inch tail.  
To close the heel of the slipper:
Turn slipper inside out.  Fold the slipper in half lengthwise.  Using a needle and the 12” tail, sew the two sides of the heel of the slipper together. 
Finishing:
Turn slipper right side out.  Sl st with main yarn toward the heel of the slipper.  Ch1, sc evenly around the opening of the slipper.  Slip st to ch 1 to join.
Tie off yarn and weave in all loose ends.
You can decorate the slippers with flowers, buttons or appliqués.

Book Review: Learn Bruges Lace by Ellen Gormley

Review:  Learn Bruges Lace by Ellen Gormley


 I recently picked up Learn Bruges Lace, the latest book by Ellen Gormley, author of Go Crochet!  Afghan Design Workbook

Bruges lace is a lovely style of crochet that imitates the ornate lace work done on bobbins.  For those who are not familiar with the technique, this step by step technique book provides a simple and effective way to learn.  After a brief history of Bruges lace, the first half of the book contains 16 pages of easy to follow stitch patterns.  There are ten patterns in total, each with a picture tutorial, clearly written instructions and symbol diagram.

The second half of the book contains eight different projects.  The variety of patterns include, a bracelet, two scarves, a blanket, three hats and a cowl.  Each pattern also includes a symbol diagram as well as a detailed photo of the finished item.

Lastly, readers are also provides a metric conversion chart and stitch guide at the back of the book for reference.

I was very pleased to be introduced to this style of crochet and think that Learn bruges lace is an ideal starting point for any crochet hobbyist.  I very much enjoyed the design and variety of patterns, as well as the layout of the instructional information.  The photos are visually appealing and detailed enough for a thorough understanding of the stitches. 

Learn Bruges Lace is available for purchase through Annie’s Crochet in either paper or digital format for $9.95.  At only $1.25 per pattern, I think this book is an exceptional value. 

For more information on Learn Bruges Lace, or to purchase the book:  Click Here
For more information about Ellen’s first book, Go Crochet!  Afghan Design Workbook:  Click Here

<!– google_ad_client = "ca-pub-6763711591421501"; /* large rectangle */ google_ad_slot = "4446411112"; google_ad_width = 336; google_ad_height = 280; //–>

Free and Spooky Halloween Patterns

Although September has not yet come to an end, Halloween seems to be in full swing in every store.  Halloween is by far my favorite holiday of the year.  I love dressing up and decorating the house.

To stick with the theme of Halloween, here are some free crochet patterns perfect for the upcoming holiday.

1.  Crochet Halloween Treat Basket Pattern:  For carrying around all of your candy! 

2.  Halloween Tombstone Ornament:  Great little decoration.

3.  Crochet Ghost Ornament:  Another great little Halloween decoration.

4.  Crochet Halloween Spider and Web

5.  Crochet Panda Bear Hat:  Could be the perfect accessory for a panda themed costume!

6.   Crochet Spooky Cup Cozies:  Great for home or the office.

7.  Crochet Witch Hat

Free Fall Crochet Patterns

Free Fall Crochet Patterns

One thing I miss about living in the Midwest is the fall.  I love going for hikes once the weather cools and the leaves begin to change colors.  Here are some free crochet patterns I found that are inspired by fall.

1.  Baby Pumpkin Crochet Beanie

2.  Amigurumi Pumpkin

3.  Autumn Leaves

4. Crochet Beret

Fall Crafts Using Burlap from Gina at FabricStreet.com!

Burlap is a great versatile fabric that can add some autumnal flair to your home without too much effort.
And since during the fall parties go from being porch centered to more living room and kitchen centered, there are a number of things you can do with burlap to add unique touches to your home that will have people asking you where you got them.
Burlap pillows are really simple to make and much cheaper than buying one. I’ve seen burlap pillows for as much as $60 when I know the materials cost less than half that.
Burlap is a pretty porous fabric so you don’t want to simply make the pillow out of the burlap. The best way is to make a plain pillow using a color similar to the color burlap you’ve bought, or you can choose a complementary colored fabric that will just bleed through the holes a little bit to give it another dimension. Plus, if you want to keep the pillows on your couch year-round you can make the pillow form out of a color that matches the rest of the room and re-make the outer covering depending on the time of the year.
You’ll need
·          Pillow form fabric cut into 12 1/2” by 20 ½”
·          Burlap fabric cut into 23” by 15”
·          Pillow filling
You stitch around the outside of the fabric, leaving an opening for turning and stuffing it. Once stuffed you sew the opening closed.
Stitch 1½ inches around three sides of the burlap fabric, insert the pillow form in the open side. Stitch shut.
For a frayed look you can just pull threads from the outside edge of the pillow, or if you’re looking for a more sleek pillow turn the burlap pillow form inside out before inserting the stuffed pillow.

If you want to add some lettering or a image, like in the image shown above, you simply create the banner panel on a third kind of fabric and then sew it in place on the burlap, making sure it’s on the side of the fabric you’ve chosen to be the outside.
Another easy thing to do with burlap is use it to cover a bulletin board or as the backing on a photo collage or frame. Obviously, this is really simple to do. Just get a corkboard or piece of cardboard in the size that you want and cover it with the burlap. You can then make a border with buttons or even decorative pushpins. The holes won’t show through the burlap so you can move things around as much as you want.
It’s also just as easy to make an earring holder from burlap, if you want to do something just for your bedroom. Simply stretch the burlap over a circle or square frame and secure it in place. Depending on the thickness of the burlap you’ve chosen and how heavy your earrings are, you might want to put 2 layers of burlap up.
If you just want to find something to do with those extra pieces of burlap you have lying around from the above projects, burlap tags are a really cute and simple way to use up those scraps.

Just cut the scraps into the sizes you want, spray then with fabric stiffener, wait for them to dry, draw or sew whatever you want on to the scraps and then glue them on to the dowels.These are perfect for a garden, window box, or kitchen window herb garden. 
You can use the same method without the dowels to label picture collages. They look great with autumn themed collages, for example Halloween costume pictures or maybe a Thanksgiving family photo collage.
And speaking of Thanksgiving, the garden labels can also easily be used to help label dishes during Thanksgiving or any party. All you need to find is some kind of base for the dowel rod so that it stands up. It might be a good use for the kids old Play doh that needs to be thrown away anyway! I would make sure to also wrap the base in burlap as well and tie it off with a piece of twine or other thin piece of fabric.
FabricStreet.com has some great affordable fabrics, including burlap.
For more project ideas and great deals on Fabric visit, Fabric Street.  You can also find them on Facebook.