Summer is coming to an end and the new school year is about to begin. Here are some great free crochet patterns for the new school year.
1. Roll-Up Pencil Case by Kim Kotary


3. Lunch Bag from Crochet Uncut

4. Spring Petals Backpack by Susan Gator


Summer is coming to an end and the new school year is about to begin. Here are some great free crochet patterns for the new school year.
1. Roll-Up Pencil Case by Kim Kotary
3. Lunch Bag from Crochet Uncut
4. Spring Petals Backpack by Susan Gator
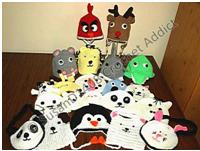
The past few days I have been getting a start on preparing my Etsy shop for the upcoming Fall and Halloween. I decided to try a few new patterns I found on Ravelry and thought I would share my favorites with you.

The first pattern I tried was for this newborn pumpkin hat. The pattern is by Danyel Pink and it was listed on FaveCrafts.com. The hat came out just like it looked in the picture. I only made a few little tweaks to the pattern. I added a row of single crochets to the bottom brim of the hat just because I thought it gave the brim a more finished look. I also added a few more rows of half double crochets to the body of the hat. I found my yarn did not have very much give, so I needed a few extra rows. This pattern is written for a newborn but it is very basic and could easily be modified to fit any size range.
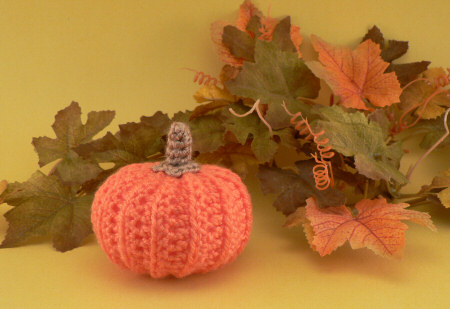
The second pattern I tried was for this amigurumi pumpkin. The pattern is written by June Gilbank from Planet June. June has the best free crochet amigurumi patterns that I have found on the web. This pumpkin came out perfectly without having to make any adjustments to the pattern. I did however decide to use a larger crochet hook and add a few stitches to make a larger version of the pumpkin. It also came out great. These little pumpkins would make great fall/Halloween decorations. I also think they would look absolutely adorable as decorations at your Thanksgiving dinner table.
I have several additional patterns I hope to try this next week as well as a few ideas for new patterns of my own. Stay tuned 🙂
<!– google_ad_client = "ca-pub-6763711591421501"; /* large rectangle */ google_ad_slot = "4446411112"; google_ad_width = 336; google_ad_height = 280; //–>


When starting a new project, I usually like to sit down and design my own crochet pattern. However, there have been many times where I am in a time crunch and it becomes necessary to use an existing crochet pattern for my project. Luckily, there are many great sites on the web full of free crochet patterns to sift through. Here are a few of my favorites.
1. Crafsy
Craftsy not only has many free crochet patterns but they also have sewing patterns, knitting patterns, craft ideas, cake decorating tips…etc. All of their free patterns are available as PDF downloads. They also have crochet patterns available for purchase. Additionally, you can take online crochet courses from Craftsy such as the course on Tunisian crochet below.

2. Ravelry
Ravelry has tons of free crochet patterns available. Some free patterns are linked to blog posts and some are available as PDF downloads. They have crochet patterns available for purchase as well. Ravelry also has knitting and sewing patterns. I like Ravelry because it gives you so many options when you search for patterns. You can search for free patterns only or you can search by size, style, yarn weight…etc. It makes finding the perfect pattern very simple.
All Free Crochet has hundreds of free crochet patterns. They are broken down into several categories, each containing links to the free patterns. The only downside to All Free Crochet is that you have to click on each link to see a photo of the pattern unlike Ravelry and Craftsy where the photos are displayed in your search results.
Crochet pattern central is very similar to All Free Crochet. Free crochet patterns are broken down into several categories, each featuring links to several free crochet patterns. Just like All Free Crochet, you also have to click on the links to see a photo of the project. However, Crochet Pattern Central also features links to tutorials as well as tips and tricks.
5. Go Directly to the Yarn Companies Websites.
My last tip is to visit some of the sites for yarn and craft companies. Lion Brand Yarn has several free crochet patterns available on their website, as does Jo-Ann Fabrics and Michaels.

I was inspired to create this pattern by my debit card. No matter what I did, my card kept getting so scratched that scanners wouldn’t read it and I would have to call the bank to request a new card. I always kept my card in my wallet but somehow it was still getting scratched.
This little cozy has proved itself to be a great solution. Since I started using it about two months ago my card has remained scratch-less. It is also very convenient to stick my ID and credit card in the cozy, throw it in my pocket and spend a day at an amusement park. I love being able to use the “guests without bags” line at Disney!


*Note: This pattern is also available as a download on the PDF Patterns page.
In my previous post, I spoke about the crochet coral exhibit that will be on display at Florida Craftsmen starting tomorrow. Today, while I was on their website I noticed that some of the contributing crocheters to the project posted free patterns they used for corals and seashells.
I was particularly excited about this find because I have been looking for a great crochet seashell pattern to decorate my condo. All of the following patterns came from the Florida Craftsmen website and can be found here.


Foundation row: Ch 21, turn.
Rows 1-15 (or more): Work (1 sc in each of next 3 stitches, increase in next stitch) across. Ch 1, turn.
For great effect, work one final row in contrast yarn. Fasten off.
We call this “n=4″ because you’re increasing in every 4th stitch. You can make a larger piece by starting with ch 31 and increasing every 6th stitch. If you prefer dc, increase in every 2nd or 3rd stitch.

© 2011 Denise Beaubien Bennett
Round 1: Ch 6; join to first ch with sl st to form a ring.
Round 2: Ch 3 (counts as 1 dc); work approx 2 dc in each ch for a total of 12 dc. Join to top of initial ch 3.
Round 3: Ch 3 (counts as 1 dc); work approx 2 dc in each ch for a total of 25 dc. Join to top of initial ch 3.
Round 4: Make a star arm:
*Ch 16. Starting in 2nd ch from hook, work: 1 sl st, 3 sc, 3 hdc, 3 dc, 3 trc, 2 qc (quad). Sl st in top of 5th and 6th dc in previous round.
Repeat from * 4 more times for a total of 5 star arms. End last arm with one sl st.
Round 5: *Work 1 sc in each st up the star arm; work 2 sc in turning chain at top of arm; work 1 sc in each st down the star arm. Work 1 sc in the “elbow” st between arms or, if you have 2 sts in the elbow, work them tog (draw up a loop in one st, draw up a loop in next st, yarn over and draw through all 3 loops). Continue from * for each star arm. End with sl st in 1st sc.

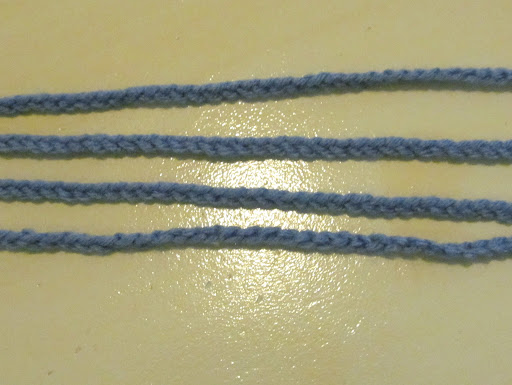
Row 1: Crochet a chain that is twice as long (maybe a little extra) as you want the finished coil.
Row 2: Sl st in 2nd chain from hook. Work 3 sc in each chain across. At the end, sl st into the chain of the previous coil. Fasten off.
Variations:
Work another row, maybe in another color, of 2 sc in each stitch across.
Work in dc for a longer, wider, looser look.
Vary your stitches around the coil (sc to hdc to dc to tr and down again) to alter the widths.
Make a round base (2-3 rounds) and work one coil out of each sc in base. At the end of each coil, sl st into the next base sc to begin another coil. On a large base (think jellyfish), sc into several base stiches between coils/legs.
For tendrils, work 2 sc in 1st several stitches. When you have enough of a coil started, continue with 1 sc in each ch. To keep them straighter at the stem, chain out in one hook size larger than the one you use to crochet back.


© 2011 Denise Beaubien Bennett
For each tube: Ch 14, join with slip stitch to first chain to form a ring. Work one sc in each ch around. Continue working even, one sc in each sc, for desired length of pillar. Work last round in a different color — try a smaller hook to draw the top in. Vary your starting chain (12 or 16 ch) to make pillars of varying circumferences. Make about 12.
For the base top:
Ch 6, sl st in 1st ch to form a ring.
Round 1: 1 sc in each ch.
Round 2: 2 sc in each sc.
Round 3: *1 sc in next sc, 2 sc in next sc. Repeat from * around; end 12 sc.
Round 4: *1 sc in next 2 sc, 2 sc in next sc. Repeat from * around; end 18 sc.
Round 5: *1 sc in next 3 sc, 2 sc in next sc. Repeat from * around; end 24 sc.
Round 6: work even (24 sts)
Round 7: *1 sc in next 4 sc, 2 sc in next sc. Repeat from * around; end 30 sc.
Round 8: *1 sc in next 5 sc, 2 sc in next sc. Repeat from * around; end 36 sc.
Round 9: *1 sc in next 6 sc, 2 sc in next sc. Repeat from * around; end 42 sc.
Round 10: *1 sc in next 7 sc, 2 sc in next sc. Repeat from * around; end 48 sc.
Round 11: work even (48 sts)
Round 12: *1 sc in next 8 sc, 2 sc in next sc. Repeat from * around; end 54 sc.
Round 13: *1 sc in next 4 sc, 2 sc in next sc. Repeat from * around; end 60 sc.
Round 14: *1 sc in next 4 sc, 2 sc in next sc. Repeat from * around; end 66 sc.
End off.
For the base bottom:
Ch 6, sl st in 1st ch to form a ring.
Round 1: 1 sc in each ch.
Round 2: 2 sc in each sc.
Round 3: *1 sc in next sc, 2 sc in next sc. Repeat from * around; end 12 sc.
Round 4: *1 sc in next 2 sc, 2 sc in next sc. Repeat from * around; end 18 sc.
Round 3: *1 sc in next 3 sc, 2 sc in next sc. Repeat from * around; end 24 sc.
Work in pattern (increasing 6 sts in each round) for 12 rounds (66 sc). End off.
Finishing:
With yarn (blunt) needle, sew each tube onto the base top. Match the base bottom (facing top down) to the base top, and sl st the bottom and top together about 3/4 of the way around. Stop and lightly stuff the base. Continue in sl st to close the base. Stuff the tubes about 1/2 to 2/3 full.

To make pillars, start at the bottom with a pancake:
Round 1: Ch 4, join with slip stitch to 1st chain to form a ring. Work 4 sc into ring.
Round 2: Work 2 sc in each sc (total 8 sc).
Round 3: Work 2 sc in each sc (total 16 sc).
Round 4: * Work 1 sc in next sc, work 2 sc in next sc; continue from * around (total 24 sc).
To form sides, work even: 1 sc in each sc (total 24 sc) and continue until you reach the desired length.
Stop and stuff the pillar (with cardboard circles, fiberfill/pillow stuffing, or a plastic object) and then begin to decrease.
Decrease round 1: *Work 1 sc in each of 2 sc, work next 2 sc together; continue from * around (total 18 sc).
Decrease round 2: *Work 1 sc in next sc, work next 2 sc together; continue from * around (total 12 sc).
Decrease round 3: *Work 2 sc together; continue from * around (total 6 sc). Slip stitch in 3rd stitch from hook. Cut yarn, draw through remaining loop, and tuck away.
Variations: change the diameter or height of your pillar.
To make a larger starting pancake, keep adding the same number of stitches in each round, such as
[Round 5: * Work 1 sc in each of next 2 sc, work 2 sc in next sc;
Round 6: * Work 1 sc in each of next 3 sc, work 2 sc in next sc; etc.]
To change the shape, try increasing or decreasing a few stitches in relevant rows. Lots of trial and error here!
To make a tapered pillar, work more rounds (at least 6, depending on thickness of yarn) of a starting pancake.
Next 2 rounds: work even.
Next round: decrease 4 stitches evenly around. To decrease: draw up a loop in one stitch, draw up a loop in the next stitch, yarn over and draw through all 3 loops on hook.
Next 4 rounds: work even.
Next round: decrease 4 stitches evenly around.
Next 4 rounds: work even.
Next round: decrease 4 stitches evenly around.
Stop and stuff the pillar before the opening gets too small!
Next 2 rounds: work even.
Next round: decrease 4 stitches evenly around.
Continue as needed to achieve the desired shape. Stop and stuff before the final 2 rows — be sure to end pancake-like rather than pointy.
Today I saw this video preview of the crochet coral reef exhibit to be displayed at Florida Craftsmen in St Petersburg, FL.
This exhibit will be on display from June 8th through September 1st. I cannot wait to see this in person!
This project is a satellite of the worldwide Hyperbolic Crochet Coral Reef Project created by Margaret and Christine Wertheim of the Institute For Figuring. The project was created to unify science and art while bringing attention to the plight of the coral reefs.
“Over 270 people have created thousands of crocheted coral, shells, fish, eels, rays and so many more incredible forms. The finished reef will fill the 1200 sf exhibition gallery with some fun surprises in store.” says the website for the Florida Craftsmen.
Yesterday, I finally got around to learning to crochet broomstick lace. I found the pattern for this crochet cuff bracelet and I really wanted to try it out.

The pattern also contains a photo tutorial for people who are left handed. I tried to figure out the stitch from the photo tutorial but couldn’t make it work. So, I searched the web and found this video tutorial from Crochet Geek for broomstick lace. After watching this video, crocheting the cuff was very simple!
